Share
How to Build Your Own AI Agent: A Step-by-Step Guide

- BLOG
- Artificial Intelligence
- May 31, 2025
Building your own AI agent used to sound like something only tech companies or engineers could pull off. But now? It’s possible for almost anyone, and businesses that aren’t using AI agents are already falling behind.
So how to build your own ai agent? You start by defining the task, then use a large language model (like GPT-4), pair it with tools or APIs (like search or email), and run it through an agent framework (such as LangChain or AutoGen).
These components allow the agent to understand your input, take action, and complete tasks, often without needing human help. Interested in building the AI agent? Keep reading, and you’ll learn the exact steps, tools, and code (or no-code) options.
Contents
- 1 What Is an AI Agent? (And What It’s Not)
- 2 Book your quote at Webisoft today to build your own AI agent.
- 3 Three Main Concepts of an AI Agent
- 4 Types of AI Agents
- 5 How AI Agents Work — Step-by-Step Breakdown
- 5.1 1. User Input or Trigger
- 5.2 2. Perception Layer: Understanding the Input
- 5.3 3. Reasoning Engine: Thinking Through the Task
- 5.4 4. Planning the Path
- 5.5 5. Action Execution Layer
- 5.6 6. Interacting With External Tools
- 5.7 7. Memory (Optional but Powerful)
- 5.8 8. Feedback & Looping
- 5.9 9. Final Output & Task Completion
- 6 Tools You Need to Build Your Own AI Agent
- 7 How to Build Your Own AI Agent from Scratch (Step-by-Step Guide With Code)
- 8 How to Build Your Own AI Agent With Low Code or No Code Platform
- 9 Common Challenges of Building an AI Agent and How to Avoid Them
- 10 How Webisoft Can Help in Building Your Own AI Agent
- 11 Book your quote at Webisoft today to build your own AI agent.
- 12 Conclusion
- 13 FAQs
What Is an AI Agent? (And What It’s Not)
An AI agent isn’t just another chatbot or GPT wrapper. It’s a system that acts. You give it a goal, and it figures out what to do without you hand-holding every step.
Unlike GPT, which just answers prompts, an AI agent plans, decides, and uses tools like web search, databases, or APIs to complete real tasks. It’s not a fixed workflow either. If something fails, it adjusts. That’s autonomy.
You can build AI automation with Python and LangChain or even no-code tools if you’re just starting out. Furthermore, AI agents operate in loops and can improve over time by storing memory.


Book your quote at Webisoft today to build your own AI agent.
Schedule a free consultation and share your needs — Webisoft will bring your vision to life as a working AI agent!
Three Main Concepts of an AI Agent
To function effectively, an AI agent relies on several core technologies that give it the ability to understand, learn, and act. The three major concepts are:
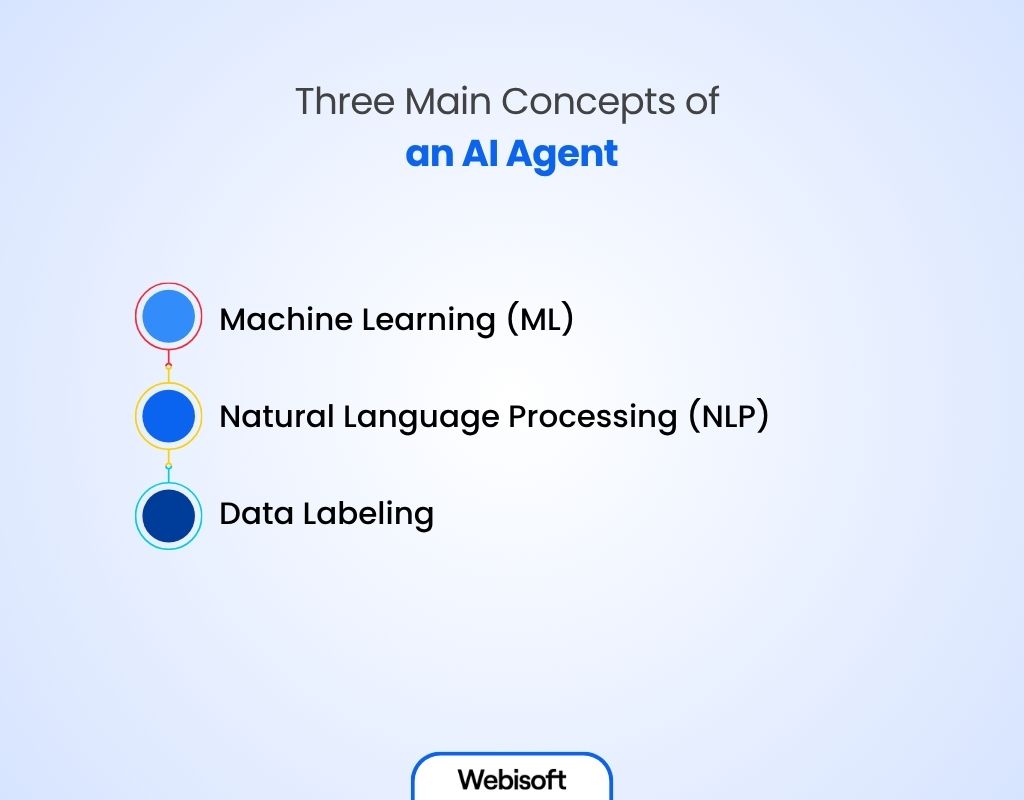
1. Machine Learning (ML)
Machine learning enables an AI agent to learn from data and improve its performance over time. It helps the agent recognize patterns, make predictions, and adjust behavior without being explicitly programmed.
2. Natural Language Processing (NLP)
NLP allows the agent to understand, interpret, and generate human language. It powers interactions like answering questions, summarizing content, or following commands in plain English.
3. Data Labeling
Data labeling is the process of tagging raw data (like text, images, or audio) with relevant information. It’s essential for training supervised ML models, helping the agent understand what different inputs mean and how to respond correctly.
Types of AI Agents
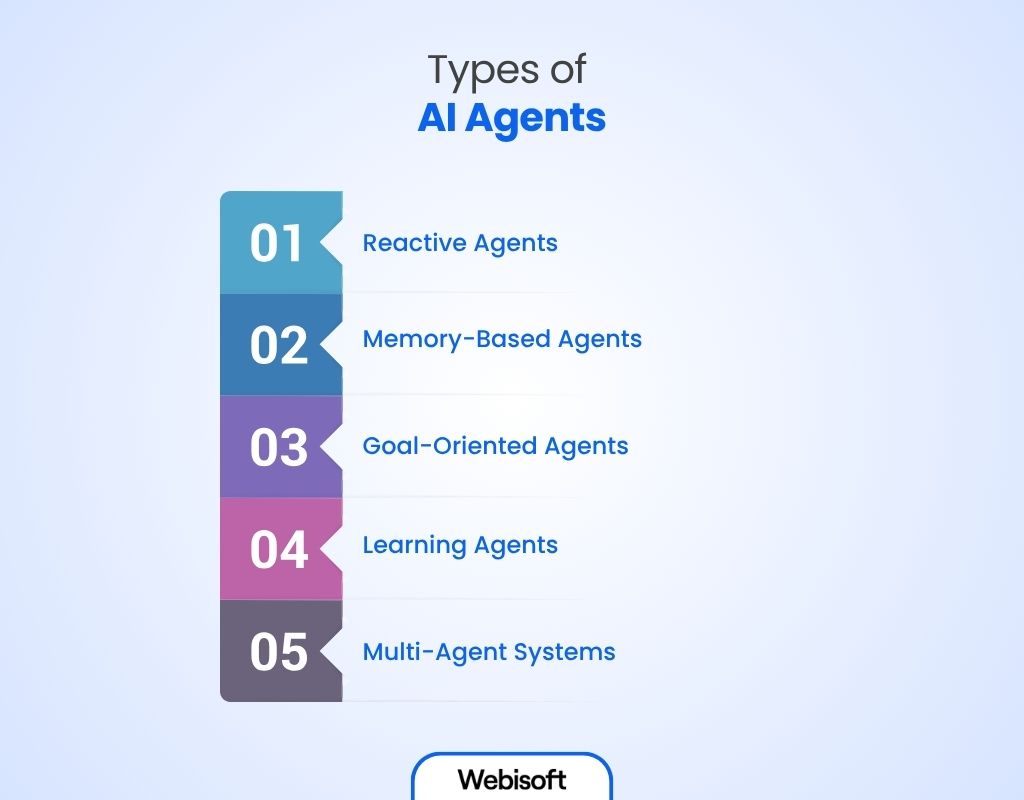
AI agents come in different types, depending on how smart or flexible you want them to be. Some are super basic, while others can manage complex tasks and even collaborate with other agents. Popular AI agent types are:
1. Reactive Agents
Reactive agents are the simplest kind of AI agents. They don’t think, plan, or remember. They respond instantly to input using pre-set logic. No memory, no learning, just a one-and-done reaction.
How it works:
- Listens for input (text, voice, sensor data, etc.)
- Matches the input against known patterns or triggers
- Delivers a fixed or rule-based response
- Doesn’t store memory or track progress over time
2. Memory-Based Agents
Memory-based agents can recall past interactions or information. They use short-term or long-term memory to make better decisions over time, often improving the user experience through context.
How it works:
- Stores user inputs, responses, and system events
- Uses memory to personalize future actions
- Retrieves past data to maintain context in a task
- Can be reset or designed to forget intentionally
3. Goal-Oriented Agents
Goal-oriented agents don’t just respond — they pursue a defined objective. You give them a goal, and they figure out the steps needed to get there. They can make decisions, choose tools, and adjust mid-task.
How it works:
- Accepts a high-level goal or instruction from the user
- Breaks that goal into smaller, manageable subtasks
- Choose which tools or actions to take for each step
- Adjusts steps in real-time based on outcomes or errors
4. Learning Agents
Learning agents take things further by improving their performance over time. They don’t just react or follow plans — they change based on feedback, environment, or outcomes.
How it works:
- Collects data from actions, results, or user feedback
- Analyzes what worked and what didn’t
- Updates future behavior based on learning models
- May use reinforcement learning or pattern recognition
5. Multi-Agent Systems
A multi-agent system is a team of AI agents, each with its own job, working together toward a shared goal. They collaborate, communicate, and hand off tasks — like a digital production line.
How it works:
- Each agent handles a specific function (writing, researching, checking, etc.)
- They share data or pass outputs to one another
- Can coordinate in sequence or in parallel
- Use communication protocols or shared memory
Comparison Table of the Types of AI Agents
| Type | Has Memory | Can Plan | Learns Over Time | Real Use Case |
| Reactive | NO | NO | NO | Keyword-based chatbot |
| Memory-Based | YES | NO | NO | Support bot that remembers user intent |
| Goal-Oriented | YES | YES | NO | Flight-booking AI agent |
| Learning Agent | YES | YES | YES | Sales assistant that improves messaging |
| Multi-Agent System | YES | YES | YES (team-wide) | AI team automating an entire workflow |
How AI Agents Work — Step-by-Step Breakdown
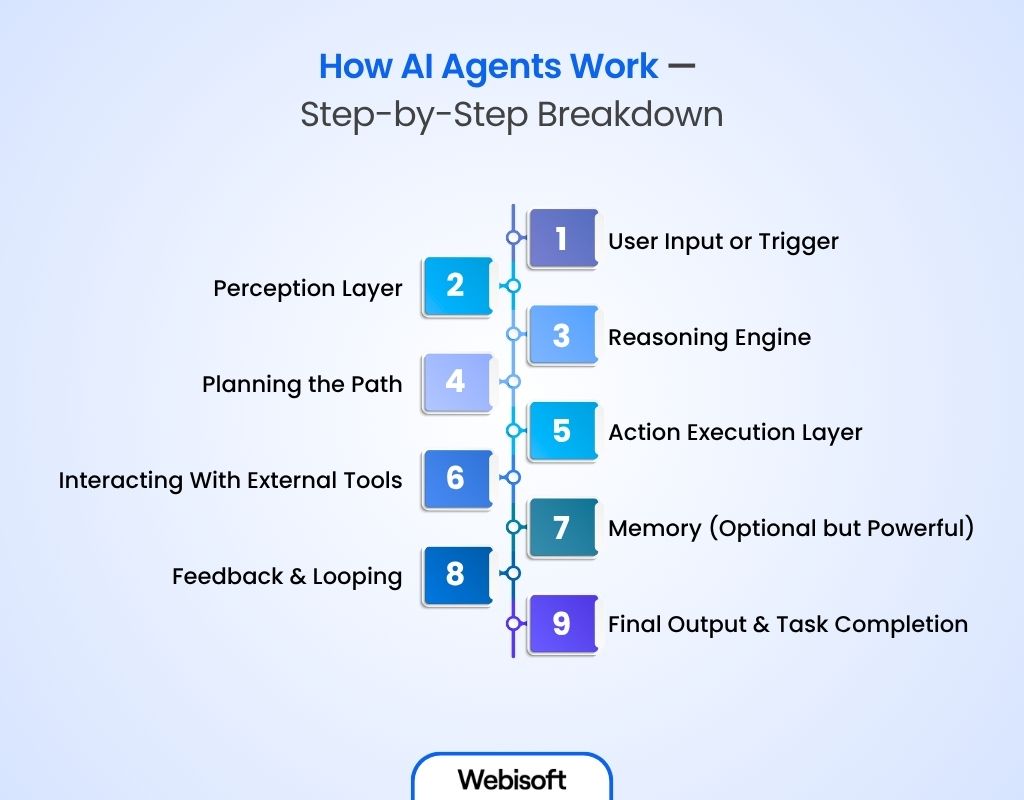
AI agents aren’t just tools that spit out answers. They’re systems that operate in a cycle, constantly observing, deciding, acting, and modifying. Here’s how that flow works in detail:
1. User Input or Trigger
Everything starts with an input, such as the task, the prompt, or the trigger that kicks off the agent. This could be:
- Users are asking, “Summarize this article.”
- A calendar update hitting a webhook.
- A new row added to a spreadsheet.
Whatever the input is, it signals the agent to begin work.
2. Perception Layer: Understanding the Input
The perception layer is the agent’s first reaction, where it tries to understand what just happened.
- If it’s text, it analyzes the language.
- In case it’s a file or data, it identifies the structure and content.
- If it’s a sensor signal or event, it checks the trigger type.
At this stage, the agent isn’t making decisions; it’s just assembling everything it needs to think clearly. Perception can involve a mix of LLMs, embeddings, and classic code logic.
3. Reasoning Engine: Thinking Through the Task
Now the real “intelligence” kicks in. The agent looks at the input and starts deciding what needs to happen. Depending on the setup, it might:
- Ask a language model (like GPT-4) to interpret the goal.
- Refer to memory (if available) to check past interactions.
- Use logic or a predefined process to figure out what step comes next.
This is where frameworks like ReAct, LangGraph, or AutoGen step in. They give structure to the reasoning process. For example:
- ReAct: Think → Act → Observe → Repeat
- LangGraph: Graph of steps where each node is a reasoning or decision point
- AutoGen: Multiple agents talking to each other to handle complex logic
4. Planning the Path
If the agent’s task isn’t just a one-off response, it needs to map out a plan to assist the user. This might look like:
- Breaking a large goal (“Write me a newsletter”) into sub-tasks
- Figuring out which tools or APIs it needs to call
- Choosing which agent (in a multi-agent system) does what
At this point, the agent is acting like a project manager; it sees the big picture and knows how to divide and make the request complete.
5. Action Execution Layer
After it assembles all the data for a reliable response, it takes action to deliver it. Your AI agent starts executing its planned actions. This could include:
- Calling APIs (e.g., Google Search, OpenAI, Twilio)
- Reading or writing data to a database
- Sending emails or notifications
- Running a Python function
- Triggering another micro-agent
Each action may produce output, which gets fed back into the loop for further decision-making.
6. Interacting With External Tools
This is what makes AI agents so useful. They’re not just smart; they’re connected. They can work with other tools and services to actually get things done. For example, an AI agent can:
- Access live data through public or private APIs (like pulling weather updates or stock prices)
- Query vector databases like Pinecone or Weaviate to retrieve context or documents
- Read from and write to platforms like Notion, Google Sheets, or CRMs (like HubSpot)Post updates in Slack, send alerts in Discord or drop files into Dropbox
- Run custom code or scripts in your own system, whether it’s on your laptop or in the cloud
However, they need your help to accomplish this task. You need to give it access to your toolbox, and let it use whatever it needs to finish the task.
7. Memory (Optional but Powerful)
If your agent has memory, it can remember what happened before — either temporarily (for the current task) or long-term (across sessions). Your AI agent can store:
- Previous prompts and answers
- User preferences
- Task history or tool usage
- Summaries of long documents or pages
This allows it to avoid repeating steps, personalize its behavior, and even improve over time. Some agents use vector stores (like FAISS or ChromaDB) to manage memory. Additionally, with human feedback, AI can update its memory more efficiently and get smarter.
8. Feedback & Looping
AI agents don’t just fire off an action and walk away. They’re built to check their own results — almost like asking themselves, “Did it actually do what I wanted?”
After taking an action, the agent automatically evaluates things like:
- Was the API call successful?
- Did the email send? Was the spreadsheet updated?
- Is the goal fully completed, or is another step needed?
If something doesn’t work or the required tool isn’t available, the agent adjusts. It either tries again, chooses a different action, or moves to a backup step if you’ve built in fallback logic.
This is called the agent loop. It’s what makes agents more resilient than traditional automated customer service. They re-think, replan, and try another way.
9. Final Output & Task Completion
Once the agent decides through feedback, it wraps up and delivers the result. You can design the output to be as lightweight or as advanced as needed. And once it’s done, the agent stops running until it’s triggered again.
Tools You Need to Build Your Own AI Agent
Before you learn the steps of how to build your own AI agent, you need to arrange the tools and framework to get started. Here’s the list:
| Category | Required Tools | Code/No Code |
| Language Models (LLMs) | OpenAI (GPT-3.5, GPT-4), Anthropic Claude, Google Gemini, Mistral, LLaMA, Falcon | Code / No-Code |
| Agent Frameworks | LangChain, AutoGen, LangGraph, Semantic Kernel, CrewAI | Code |
| Tool Integration & Actions | Zapier, Make, SerpAPI, Twilio, Google Sheets API, Custom REST APIs | Code/No-Code |
| Planning & Reasoning Frameworks | ReAct, LangGraph, AutoGen | Code |
| Memory & Context Storage | Pinecone, FAISS, Weaviate, Chroma, Redis | Code |
| User Interface (UI) Tools | Streamlit, Gradio, LangFlow, Relevance AI | No-Code/Low-Code |
| Prompt Management & Optimization | PromptLayer, LangChain PromptTemplates, Humanloop | Code |
| Hosting & Deployment | Vercel, Render, Heroku, Replit, FastAPI, Flask | Code |
| Multi-Agent Collaboration | AutoGen, CrewAI, LangGraph | Code |
| No-Code & Low-Code Builders | LangFlow, Relevance AI, Zapier + OpenAI, AgentForge | No-Code/Low-Code |
| Useful Libraries | Transformers (HuggingFace), OpenAI Python SDK, LangChainHub | Code |
How to Build Your Own AI Agent from Scratch (Step-by-Step Guide With Code)
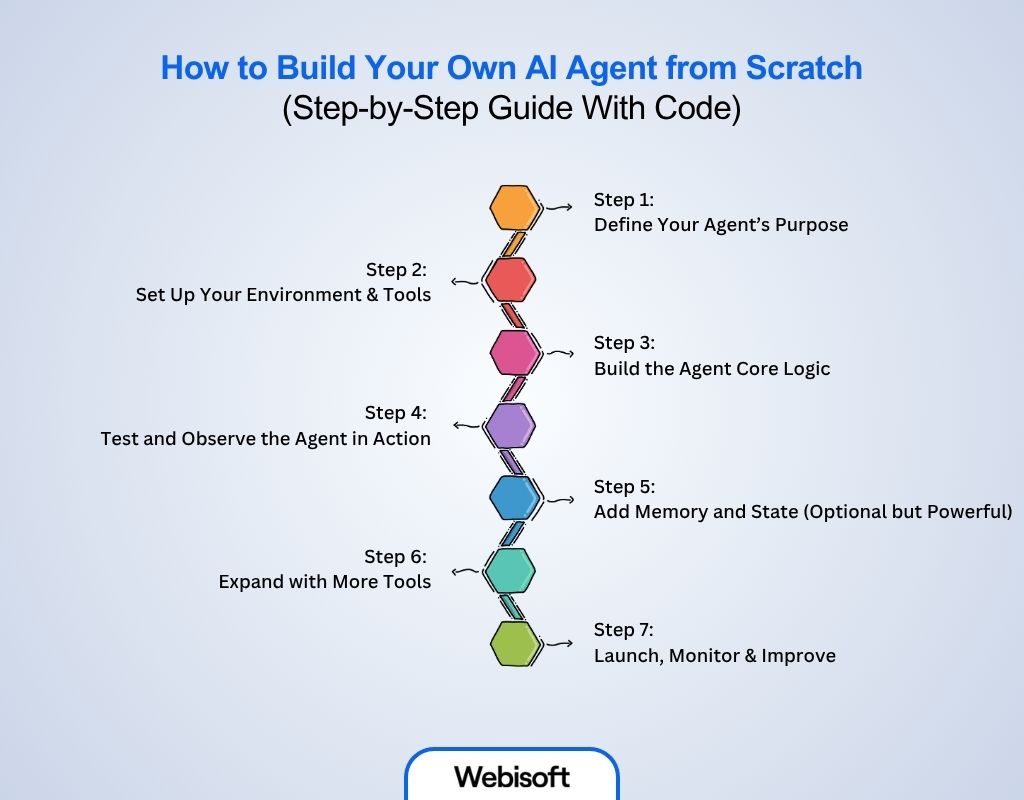
You can build your own AI agent following two methods: using codes or using an existing framework. Here you’ll learn about how to build your own AI agent from scratch step-by-step:
Step 1: Define Your Agent’s Purpose
Before writing any code, decide exactly what you want your AI agent to do. Do you want it to search the web, summarize content, send alerts, or handle tasks automatically?
You can get AI strategy consultation from Webisoft.
A clear goal helps you choose the right tools and build the logic properly. For example, if you’re creating a research assistant, it should be able to —
- Search for information
- Remember what it found
- Give you a short summary.
Getting this part right makes the rest of the process much easier.
Step 2: Set Up Your Environment & Tools
Next, prepare your prime tools from the required tools list, such as:
- Python 3.10+
- LLM access (like OpenAI’s GPT-4)
- A tool API (e.g., SerpAPI)
After that, install necessary libraries:
pip install langchain openai serpapi
Then securely set your API keys:
import os
os.environ[“OPENAI_API_KEY”] = “YOUR_OPENAI_KEY”
os.environ[“SERPAPI_API_KEY”] = “YOUR_SERPAPI_KEY”
This gives you your agent’s brain (GPT), reasoning framework (LangChain), and action capability (SerpAPI).
Where to Use These Codes
You have three options:
Option 1: Run in a Python File (Locally on Your Computer)
- Open VS Code, PyCharm, or any text/code editor.
- Create a new file and name it something like:
ai_agent.py
- Paste the full code block into that file.
- Save it.
- Open a terminal (Command Prompt, Terminal, or inside VS Code)
- Navigate to the folder where you saved the file using cd
- Run the file:
python ai_agent.py
Option 2: Use Google Colab (No setup required)
- Go to Google Colab
- Start a new Python notebook
- Paste the code into a new code cell
- Replace “your-openai-key” and “your-serpapi-key” with real keys
- Hit Shift+Enter to run the cell
Note: This is great for beginners — no installation needed.
Option 3: Use Replit (Runs in browser)
- Go to Replit and create a new Python project
- Paste your code into the main.py file
- Click Run
- See the result in the console on the right
Step 3: Build the Agent Core Logic
Now it’s time to assemble the agent. Using LangChain’s ReAct pattern gives you a simple yet powerful structure: think → act → observe. Here’s how to set it up:
from langchain.agents import initialize_agent, Tool
from langchain.llms import OpenAI
from langchain.utilities import SerpAPIWrapper
search = SerpAPIWrapper()
tools = [
Tool(
name=”Search”,
func=search.run,
description=”Search the web for current information.”
)
]
llm = OpenAI(temperature=0)
agent = initialize_agent(
tools=tools,
llm=llm,
agent=”zero-shot-react-description”,
verbose=True
)
This code defines a language model, exposes a web search tool, and ties them together into an agent who can reason, call tools, and respond.
Step 4: Test and Observe the Agent in Action
Time to test-drive it. Ask your agent a real question:
response = agent.run(“What are the latest trends in AI regulation?”)
print(response)
You’ll see a breakdown of its thought process: it decides to use Search, queries the web, and then synthesizes an answer with GPT.
Step 5: Add Memory and State (Optional but Powerful)
Most basic agents forget after one interaction. To build a more useful assistant, give it memory. Use tools like Pinecone or Chroma to store context:
from langchain.memory import ConversationBufferMemory
memory = ConversationBufferMemory()
agent = initialize_agent(
tools=tools,
llm=llm,
agent=”zero-shot-react-description”,
memory=memory,
verbose=True
)
Now it can recall past exchanges, improving coherence over multi-step dialogues.
Step 6: Expand with More Tools
The initial steps of how to build your own AI agent are complete. Once your basic setup works, you can level it up by adding more capabilities. For example:
- Email API to send reports
- Google Sheets API for data logging
- Twilio to send SMS updates
- Custom REST endpoints for business logic
Step 7: Launch, Monitor & Improve
Once your AI agent works locally, the next step is to launch it online so others can use it or so it can connect with real-world apps. After that, you’ll want to track its behavior and refine how it performs based on real usage.
How to Launch Your Agent
There are two easy ways to get your agent up and running on the web:
Option A: Streamlit (for a user-facing web app)
Streamlit is perfect if you want a simple web interface where people can type in prompts and get answers.
1. First, you need to install Streamlit:
pip install streamlit
2. Create a new file (app.py) and paste this:
import streamlit as st
st.title(“AI Agent”)
user_input = st.text_input(“Ask something:”)
if user_input:
response = agent.run(user_input)
st.write(response)
3. To start your app locally, you need to open your terminal > navigate to the folder containing your app.py file > run this command:
streamlit run app.py
Streamlit will display a local URL (usually http://localhost:8501). Open this URL in your web browser to interact with your app.
4. To make it accessible online, publish it using Streamlit Cloud, Render, or Railway.
Option B: FastAPI (for a backend API)
If you’re building a backend service or want to integrate the agent with a frontend or mobile app:
1. Install FastAPI:
pip install fastapi uvicorn
2. Create main.py:
from fastapi import FastAPI
from pydantic import BaseModel
app = FastAPI()
class Prompt(BaseModel):
input: str
@app.post(“/ask”)
def ask(prompt: Prompt):
return {“response”: agent.run(prompt.input)}
3. Start the server:
uvicorn main:app –reload
4. Push your code to GitHub and host it on platforms like Render, Railway, or Heroku.
How to Track & Monitor Performance
After your agent is live, it’s important to keep an eye on how it’s behaving. This helps you spot bugs, improve speed, and avoid wasted API usage. What to track:
- Which tools the agent uses and how often
- Whether actions succeed or fail
- How many steps it takes to complete tasks
- Total token usage (important for API costs)
- User queries and how well the agent responds
How to do it:
Use Python’s logging module or send events to tools like Logtail, Posthog, or even a basic Google Sheet.
import logging
logging.basicConfig(filename=’agent.log’, level=logging.INFO)
try:
response = agent.run(user_input)
logging.info(f”Prompt: {user_input} | Response: {response}”)
except Exception as e:
logging.error(f”Agent Error: {str(e)}”)
How to Refine & Upgrade Your Agent
Once you’ve collected feedback and data, start improving:
- Tweak your prompt templates to reduce confusion
- Swap out unreliable tools for better ones
- Add fallback logic for common failure points
- Optimize token usage and speed
How to Build Your Own AI Agent With Low Code or No Code Platform

Want to know how to make an AI bot without using any codes? Here are the steps:
Step 1: Choose a Platform
First, you need to select a platform based on your needs. Choose the tool that aligns with your goal and how much customization you need. For example:
- LangFlow is great for visual agent building with flexibility.
- Relevance AI is ideal for business use and document workflows.
- Zapier + OpenAI works best for automating small tasks.
Step 2: Set Up Your Account and APIs
Create a free account on your chosen platform. Connect your OpenAI API key or any other required services like Google Sheets or Slack. These keys allow the agent to process prompts and interact with external tools.
Step 3: Define the Agent’s Task
Clearly define what the agent should do. Whether it’s summarizing documents, answering questions, or automating form responses, having a focused task will help you build an effective workflow.
Step 4: Build the Agent Visually
Use the platform’s visual editor to drag and connect components. Add blocks like prompts, memory, or tool integrations. Arrange them in a logical flow, for example:
- user input → LLM → response → action
Tools like LangFlow and Relevance AI let you do this without code.
Step 5: Upload Your Own Data
If your agent needs access to files or private info, you can upload data manually. Platforms like Relevance AI support PDFs, CSVs, and spreadsheets. In LangFlow, you can use file or URL loaders to pull in documents and connect them to retrieval blocks.
Step 6: Test, Adjust, and Launch
Run test queries to see how your agent responds. Adjust prompts, block order, or tool settings as needed.
Once it works well, publish it or share it via a link or embed. Some platforms also offer basic monitoring features to help you track usage.
Common Challenges of Building an AI Agent and How to Avoid Them
Here are some common challenges you may face while building an AI agent and how to solve them:
1. Agents Getting Stuck in Loops
Agents sometimes keep calling the same tool or repeating reasoning steps without ever completing the task.
Why it happens:
- The agent can’t recognize when it has enough information
- Prompts are too vague or goal definitions are unclear
- Tool outputs aren’t satisfying the model’s criteria
How to fix it:
- Set a max iterations limit (e.g. max_iterations=5 in LangChain)
- Add explicit stop conditions or tool response checks
- Prompt the agent to verify whether the goal is met after each step
- Use verbose=True and read the thought-action-observation loop to identify where it gets stuck
2. Poor Memory Management
Agents forget important context or repeat themselves unnecessarily.
Why it happens:
- You’re not using a memory module
- You’re feeding only the last input/output into the agent
- Vector store integration is poorly configured
How to fix it:
- Use short-term memory like ConversationBufferMemory for context in a single session
- For long-term memory, integrate a vector store like Pinecone, FAISS, or Chroma
- Chunk your documents well — 500–800 token chunks with overlap work best
- Store and retrieve relevant pieces only, not entire histories
3. Tool Invocation Errors
The agent calls tools incorrectly or doesn’t call them at all when needed.
Why it happens:
- The tool isn’t properly registered
- Descriptions are too vague
- The LLM doesn’t understand when or how to use the tool
How to fix it:
- Write clear, specific tool descriptions
- Test tools independently before integrating
- Log the tool inputs and outputs to trace errors
- Use handle_parsing_errors=True in LangChain to avoid agent crashes
4. Model Hallucinations
Your agent confidently makes things up — wrong facts, fake links, imaginary tools.
Why it happens:
- LLMs are designed to predict text, not verify truth
- Agent lacks access to accurate tools or live data
- You’re relying too much on the LLM instead of structured retrieval
How to fix it:
- Use retrieval-augmented generation (RAG) for factual tasks
- Route questions to tools (like SerpAPI, vector DBs) before asking the LLM to answer
- Post-process LLM responses: verify links, facts, or numbers before returning output
- Fine-tune prompts to instruct the model to say “I don’t know” when appropriate
How Webisoft Can Help in Building Your Own AI Agent
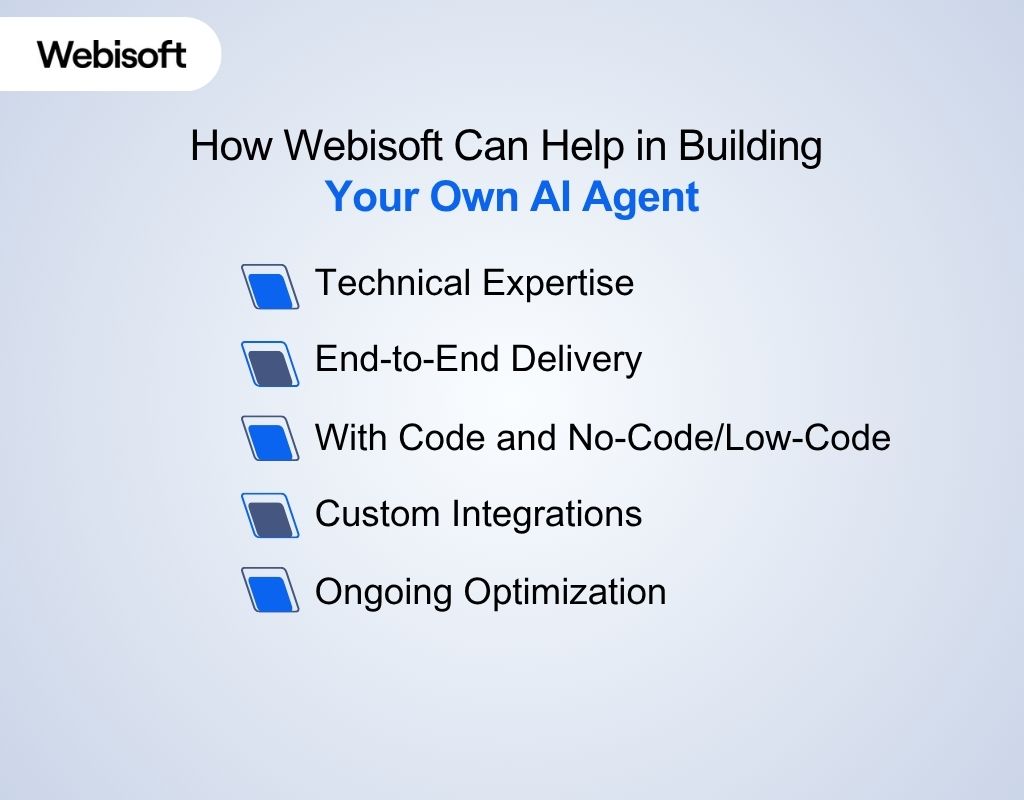
Building an AI agent is a strategic method, requiring skills in coding and understanding tools. Whether you’re a startup founder, product lead, or AI developer, Webisoft can help you go from idea to working AI agent. Here’s what Webisoft brings to the table:
Technical Expertise
Webisoft specializes in frameworks like LangChain, AutoGen, and LangGraph and knows how to combine them with GPT-4, custom tools, APIs, and vector databases.
End-to-End Delivery
From defining use cases and designing flows to building, testing, and deploying agents, we manage the full build cycle — fast and reliably.
With Code and No-Code/Low-Code Support
The skilled team at Webisoft can create a personal AI agent from scratch with your vision.
But what if you’re interested in using platforms like LangFlow, Relevance AI, or Zapier? No worries, Webisoft has your back in this regard too. They can help set up powerful agents without writing code.
Custom Integrations
Need your agent to talk to your CRM, internal docs, Slack, or spreadsheets? Webisoft can build custom connectors that make your agent actually useful in your workflow.
Ongoing Optimization
Once your agent is live, we don’t just leave it there. The Webisoft team monitors and refines prompts, improves tool logic, and scales up performance based on real usage.
Book your quote at Webisoft today to build your own AI agent.
Schedule a free consultation and share your needs — Webisoft will bring your vision to life as a working AI agent!
Conclusion
In conclusion, learning how to build your own AI agent opens the door to automating tasks, increasing productivity, and scaling smarter. Whether you’re using code or no-code tools, the right approach makes all the difference.
If you want expert guidance, tool integration, or full development support, Webisoft is here to help. Contact Webisoft to build your AI agent that’s customized, powerful, and production-ready according to your needs.
FAQs
Here are some commonly asked questions regarding how to build your own AI Agent —
How Much Does It Cost to Build an AI Agent
Using no-code tools like LangFlow or Relevance AI can cost nothing to a few hundred dollars monthly. Custom-coded agents using OpenAI, LangChain, and APIs can range up to $700, depending on complexity.
What’s the best framework in 2025?
As of 2025, LangChain remains the most flexible and well-supported framework for single-agent logic. For multi-agent systems, AutoGen leads the way. If you want structured flows with memory, LangGraph is a solid choice. Beginners may prefer LangFlow for a visual approach.
How long does it take to build one?
If you’re using no-code platforms, a basic agent can be built in a few hours. A fully functional, coded AI agent with custom tools and memory typically takes 1–3 weeks, depending on complexity, integrations, and testing.
